The experience with my first Juniper certification

Last week I got my first Juniper certification, JNCIA-Junos, and I’m pretty excited about it. I had to start with this exam, which is somehow equivalent to CCNA,  for two reasons:

– it’s mandatory for all other Juniper exams
– as I start with a new vendor technology I need to get a good understanding of how Junos is working and how this CLI is different from Cisco one

Maybe you are curious why I wanted to go with another certification vendor than Cisco. Well, I felt the need to do something different, but still related to networking technology. I’m not thinking to move away from Cisco, as this is still my strong point, but I don’t want my mind to get used to think only “Cisco style”. If I may say like this, I want to “think  out of the box”. I went with Juniper as I was always curious about their products and the way they handle routing protocols, configuration, network interconnections and so on…

I must say it, the preparation and exam experience, was a very pleasant one. First of all, after registration, on the Juniper website, I got access to their Learning Portal from where I could download two books in PDF format, free of charge.  I already have the necessary networking fundamentals knowledge, so these two books were enough to prepare for this exam. If you are a beginner, there is another eLearning course available on the same Juniper Learning Portal called “Networking Fundamentals” which is also free of charge. I checked some chapters from this course and I was surprised how nice and clear the explanation was. Beginners can easy understand and learn the basic concepts.

The theory was fine, but I wanted to have some hands on experience, so I start looking on Internet about some cheap solutions to prepare. I was lucky enough to get two boxes with Junos on them. After connecting them, I was able to start with the basic configuration and ended configuring IGP, BGP, filtering, route manipulation, etc. I also established some connections between Cisco and Juniper and configure inter-vendor routing protocols IGP and BGP. That was fun and I will add in future some “how-to” on my blog.

Next, on the Juniper Learning Portal, any certification candidate can take a Pre-assessment exam. If you pass, you will get a voucher which offer you 50% discount from the exam price. A nice welcome gift!

Without breaking the agreement, I think I may say that the exam was “to the point” with clear questions expecting clear answers. No room for tricky interpretations of the questions, so if you did your lessons you will pass for sure.

On and on, it was a nice experience which did offer me an appreciated break from CCIE preparation. Depending on the available time, I think I will continue with JNCIS-ENT.

I have to mention only one ugly point during my entire experience with this Juniper certification. Those of you who follow me on Twitter or LinkedIN already know what I’m talking about. I had to attend this exam three times and not because I failed, but because the first two times, the testing center was thinking that my time worth nothing. Long story short, 1st time they said that there is an update ongoing and they cannot held exams. After rescheduling with help of Prometric, at the time and date suggested by the testing center, I went for the 2nd attempt just to find out that the testing center was closed and they did cancel (?!) all exams without any information. Finally, 3rd time I did book with another testing center. In the past I used this testing center for Cisco certifications. As expected the things went smooth this time. I’m not blaming Juniper or Prometric for the first two experiences, but nevertheless I’m expecting at least that they will notify the testing center about this unacceptable behavior.

Finally, my blog will remain mainly focused on Cisco, but I will also add some articles about Juniper / Junos in form of beginners how-to. I hope my articles will become more complex as I will gain more Juniper knowledge and my idea is to develop some scenarios which involve Cisco and Juniper mix environment.

If you have questions please use the comment form, but please don’t ask questions that I cannot respond to (ex. questions from exam).


[Infographic] The Journey to Cisco Certification Success

I found this great Infographic on Pinterest and I felt the need to share it though my blog. Even if not all information are 100% accurate of complete, it’s still a nice view that worth spending some minutes to check.


Cisco Menu for Console Server

Let’s say that you have a Cisco router that you use as console server to connect to your devices in the CCIE testing rack. If you want to allow other people to access your rack for training and don’t want to mess explaining how to connect to different device from the console router, then you need a menu for easy access.

We will define a menu on your console server. We’ll start by going to configure terminal mode and hit the command menu ?:

Console-Server(config)#menu ?
  WORD  Name of this menu

Looks like we need to define a name for your menu, so I’ll name it “CS” menu and hit another ? mark:

Console-Server(config)#menu CS ?
  clear-screen  Use termcap database to clear screen
  command       Set menu command
  default       Item number to use for RETURN
  line-mode     require <enter> after typing selection
  options       Set per-item options
  prompt        Set prompt string
  single-space  single-space menu entries on display
  status-line   Display user status at top of screen
  text          Set text of menu line
  title         Set menu title

This command will output your options for the menu configuration. I will start by cleaning the screen after entering the menu CS:

Console-Server(config)#menu CS clear-screen

Next, I want to know where people are connecting and what’s the purpose of this console server, so I will add a title to my menu:

Console-Server(config)#menu CS title ^
Enter TEXT message.  End with the character '^'.
Welcome to FirstDigest.com CCIE Rack
^

We have now a menu with a title, but let’s tell users how to use this menu:

Console-Server(config)#menu CS prompt ^
Enter TEXT message.  End with the character '^'.
Choose and option and press Enter:
^

To really need your user to press Enter, you need to specify this option in your menu:

Console-Server(config)#menu CS line-mode

If you don’t add the above option, the picked options from menu it’s automatically run without waiting for the key Enter.
We have the menu defined and the necessary information in place. Let’s add some functionality to this menu.
First I want to give user the option to see the IP address where he’s connected:

Console-Server(config)#menu CS command 1 sh ip int brief | e una
Console-Server(config)#menu CS text 1 Check the Console Server IP Address  
Console-Server(config)#menu CS option 1 pause

What I did above? Well, I added the necessary command to check the IP Address. This command can be modified to meet your requirements. For me this is enough since I have only one interface with IP address. This command is invisible to the connected user. I mean if you press the key 1 and then Enter, you get the output. Still, we don’t want our users to guess what they have to do, so we’ll add some text.

The visibile choice for your user is added with the “text” option and my phrase is “Check the Console Sever IP Address”. Of course this can be customized as you need.

Last option is the “pause” option. If you don’t add the “pause” then your user will see no output,as the command will be run in the background and will return to prompt.

You have to notice that the item 1 (in my case) is the parameter that bound together all options for this specific part of the menu. It will be display of course for key 1 on your keyboard.

Next, we’ll give the user the option to disconnect from the console server:

Console-Server(config)#menu CS command 2 exit
Console-Server(config)#menu CS text 2 Disconnect from Console Server

Let’s add some connections to our Cisco devices in the rack. I will add only a couple of connection, as an example. You can extended and customize this commands as you want:

Console-Server(config)#menu CS command 3 telnet 10.1.1.1 2001
Console-Server(config)#menu CS text 3 Connect to R1
Console-Server(config)#menu CS command 4 telnet 10.1.1.1 2002
Console-Server(config)#menu CS text 4 Connect to R2          
Console-Server(config)#menu CS command 5 telnet 10.1.1.1 2003
Console-Server(config)#menu CS text 5 Connect to R3
.
.
.
.

We have the menu configured now. To check what we did configure, I usually do:

Console-Server#sh run | i menu

The menu section is completed, but we need to add this menu to a user and force this user to use our menu. I will create a user which will run the menu CS as soon as he or she is connected to the console router. My user has a privilege 15 level. If you are concerned with security, you can set another privilege level, but be sure to configure that level to support the commands that you have in your menu. Also I will configure another user, for my usage, or in case that something goes wrong to be able to connect remotely and fix the issue. This “Admin” user will not run automatically the menu we just create.

Console-Server(config)#username Tester privilege 15 password tester2012
Console-Server(config)#username Tester autocommand menu CS
Console-Server(config)#username Admin password cisco2012
! I will enable also telnet to test from remote host
Console-Server(config)#line vty 0 4
Console-Server(config-line)#login local

I will simulate a remote connection to check if everything is working fine:

R2#telnet 10.1.1.1
Trying 10.1.1.1 ... Open
 
 
User Access Verification
 
Username: Tester
Password: 
 
Welcome to FirstDigest.com CCIE Rack
 
 
    1          Check the Console Server IP Address
 
    2          Disconnect from Console Server
 
    3          Connect to R1
 
    4          Connect to R2
 
    5          Connect to R3
 
 
Choose and option and press Enter:

The menu is there. I will try some options to see if it’s working properly:

Choose and option and press Enter:
1
Interface                  IP-Address      OK? Method Status                Protocol
FastEthernet0/0            10.1.1.1        YES manual up                    up
Choose and option and press Enter:
2
 
[Connection to 10.1.1.1 closed by foreign host]

I recommend that you verify the menu functionality before you go “live”. You can check the menu directly on the Console Server:

Console-Server#menu CS

I hope this short tutorial will help you. If you have questions or something is not clear from my explanation please use the comments and I will try to help you.


IP Prefix-List tricky question

A few days ago I did encounter a task in one of these preparation workbooks for CCIE R&S Lab which was very tricky. This task is not a hard one and does not require extensive knowledge (it can be a CCNP level question as well), but the way the question is formulated can create confusion.I would appreciate your comments on this topic.

The task states that I have a number of subnets from which the followings are important for
our issue:

10.4.1.4/30
10.4.2.8/29
10.4.3.16/28
10.4.4.32/27
10.4.5.64/26
10.4.6.128/25

The other present subnets are something like 10.7.x.x. I add this here just to see that it does not affect the result of this task.

The request is to configure a prefix-list following these rules:

– allow all subnets in 10.4.0.0
– as specific as possible, I should not allow other prefixes
– minimum number of prefix-lists

Considering the above one I did consider the following to be the correct answer:

ip prefix-list ONE permit 10.4.0.0/21 ge 25 le 30

However the proposed solution was:

ip prefix-list ONE seq 5 permit 10.4.0.0/22 ge 23 le 30
ip prefix-list ONE seq 10 permit 10.4.4.0/22 ge 23 le 28

Both solutions are working, nevertheless which one would be the correct one in the exam?

I asked this question on the GroupStudy List, and Maarten Vervoorn came up with a new proposal:

ip prefix-list ONE seq 5 permit 10.4.0.0/22 ge 28 le 30
ip prefix-list ONE seq 10 permit 10.4.4.0/22 ge 25 le 27

Also a good solution, but is the best solution? Hard to say. The advice that I got is that if you have such task in the lab exam to describe the issue to your proctor, explain all possible solution so he or she can see that you fully understand the multiple solutions and base on the answer pickup the best solution. I think this is the only way to solve this kind of questions. If you have other ideas, I would like to hear them.


Packet header graphic representation

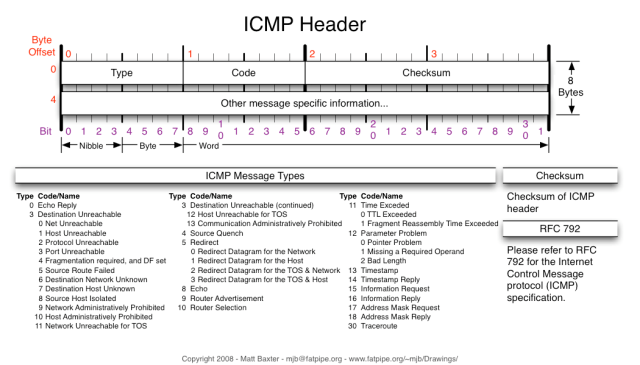
I was surfing the Internet in search of some good drawing representing packet header and I come across five excellent diagrams large enough ( 1050px wide ) to use digital but also for printing. The person behind these excellent drawings is Matt Baxter, but his site (fatpipe.org) is not accessible anymore. I found these documents on the Internet and I thought to add them here together.

You will find a link at the bottom of this post where you can download them all together.

Disclaimer: These drawings are not mine and I don’t claim any rights on them. My thanks and all copyrights go to Matt Baxter.
Matt, if you come across this blog and you find sharing to be inappropriate, please contact me.

IPv4 Header

IPv4 Header

IPv6 Header

IPv6 Header

TCP Header

TCP Header

UDP Header

UDP Heater

ICMP Header

ICMP Header

Download all drawings here:

Packet header representation