A while ago, I wrote an article about How to integrate GNS3 with VirtualBox in which I have shown how you can easily create a guest machine with its own Operating System and attach it with GNS3. Everything is working fine when you have the system in front of you, and if you have a graphical interface, but what if you have a powerful server somewhere and you want to use it for virtualization with VirtualBox? Of course, you can use CLI to manage VirtualBox, create new machines, tune settings and so on, but it’s more likely to you would like to see something graphic and use the point and click method to achieve results.
One of the differences between VMware and VirtualBox, is that VMware is including a Web Interface for remote management and VirtualBox is, in fact, a desktop application. This keep me for using sometimes VMware instead of VirtualBox on remote machines. As you probably observed I’m not a big fan of VMware due to the fact the it’s integration with Ubuntu (my favourite Linux flavour) is not running all the time as expected. For example, in case of a kernel upgrade you’ll have to patch again the source to obtain working VMware modules.
OK, enough with talking, the news is that now you can easily manage VirtualBox over Web Interface due to phpVirtualBox. What is phpVirtualBox? According to it’s developers phpVirtualBox, “is an open source, AJAX implementation of the VirtualBox user interface written in PHP with a modern web interface that allows you to access and control remote VirtualBox instances.”
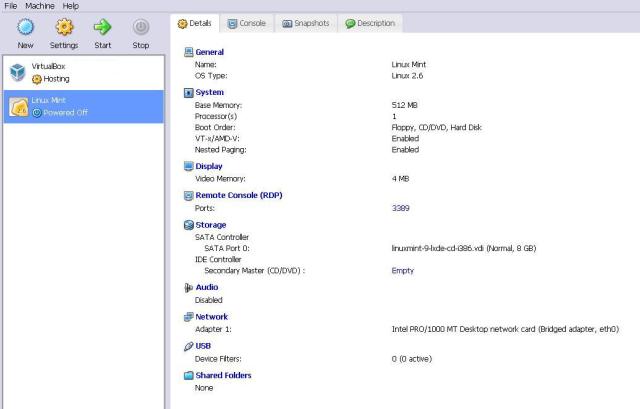
phpVirtualBox interface, open in a browser, looks something like this:

Almost like the VirtualBox application on your desktop.
Installation is very simple and you can do it following the steps below (for Ubuntu 9.10).
As any web interface, phpVirtualBox require some mandatory software to be installed on your machine. In this case is Apache + PHP >= 5.2.0. I assume that you have them already installed. If not, please check this tutorial.
1. Add in your /etc/apt/source.list
deb http://download.virtualbox.org/virtualbox/debian karmic non-free
2. Update your repository
apt-get update
3. Install VirtualBox
apt-get install virtualbox-3.2
if you have problems finding it, then try to search for virtualbox:
apt-cache search virtualbox
4.phpVirtualBox requires you to start vboxwebsrv (a program distributed with VirtualBox).
Optional step – Create a user that will run vboxwebsrv or you may run it with your existing user
Then start vboxwebsrv
su vbox -c ‘/usr/bin/vboxwebsrv -b –logfile /home/vbox/vb.log –host 1.1.1.1 –port 18083’
vbox – user that I have created to run vboxwebsrc
-b – run in background
–logfile – where you want to keep your log file
–host – IP address where the process to listen; useful if you keep your VirtualBox on one machine and the phpVirtualBox web interface on another one; if you don’t specify this paramter it will default to 127.0.0.1 and you can access it over web interface only if the phpVirtualBox script is on the same machine with VirtualBox software
–port – on which port this daemon will listen
5. Download phpVirtualBox
wget http://phpvirtualbox.googlecode.com/files/phpvirtualbox-0.5.zip
This is the last release now, but in the future it may be deprecated, so please check phpVirtualBox downloads for the latest version
6. Unpack the phpVirtualBox archive in a directory that is accessible from Web and edit config.php file
unzip phpvirtualbox-0.5.zip
cd phpvirtualbox-0.5
nano config.php
You’ll need to edit the following mandatory parameters:
/* Username / Password for system user that runs VirutalBox */
var $username = ‘vbox’;
var $password = ‘your-password’;
var $location = ‘http://1.1.1.1:18083/’;
Now you should be able to access phpVirtualBox using your customized URL in web browser.
Below you have some screen shots, just to get an idea about this excellent piece of software. The rest I’ll let you discover by your own.
Add new machine. Easy as that:

Fine tune machine settings:

Import VirtualBox appliance:

